Planning a kitchen downlight layout is one of the most important decisions you’ll make during a kitchen renovation. Get it right, and you’ll have a bright, even, shadow-free space that’s a pleasure to cook in. Get it wrong, and you’ll be left with harsh glare, dark corners, and annoying shadows across your worktops.
This guide gives you the exact layout and spacing rules used by professional lighting designers – plus diagrams and real examples for every kitchen shape.
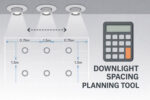
Need quick calculations? Use our Downlight Spacing Calculator to get personalised spacing recommendations for your kitchen.
Why Kitchen Downlight Layout Needs Tighter Planning
Kitchens aren’t like other rooms. You can’t just space downlights evenly across the ceiling and hope for the best.
Here’s why kitchens are different:
Worktops create shadow risks. When you stand at a kitchen worktop, your body blocks light from ceiling fixtures behind you. This creates shadows exactly where you need to see – on your chopping board, in your mixing bowl, across your prep area.
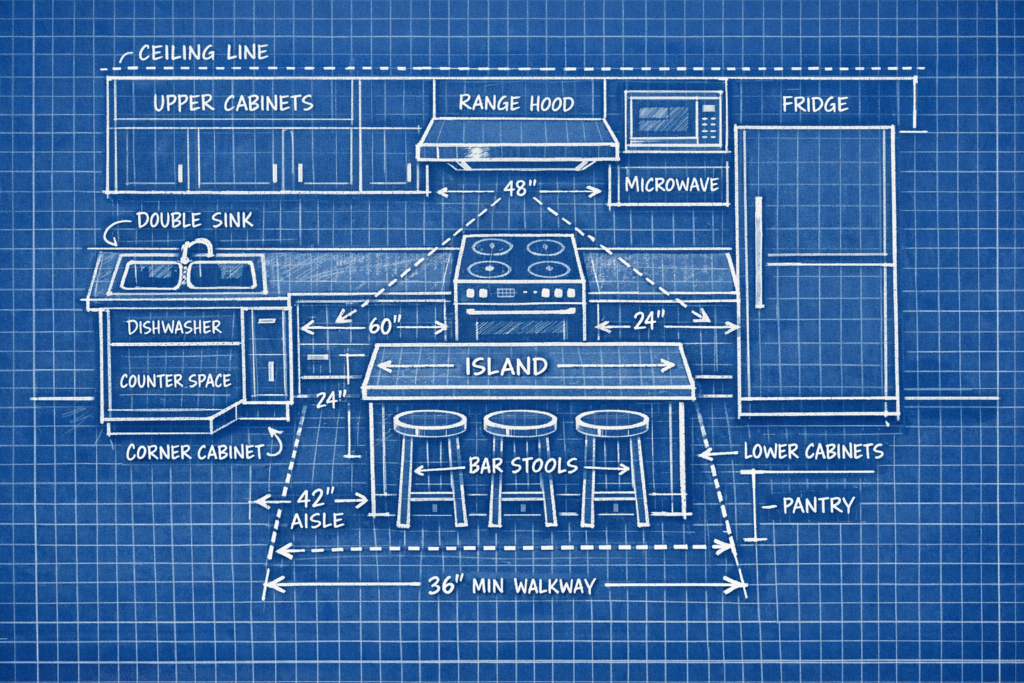
Wall cabinets complicate placement. Upper cabinets extend 30-35cm from the wall. Place downlights too close and you’ll light the cabinet doors instead of the worktop. Too far away and shadows return.
Multiple task zones need different lighting. Cooking, prepping, washing up, eating – each zone has different requirements. A single grid of downlights rarely serves all of them well.
This is why spacing matters more than brightness in kitchens. You can always dim lights that are too bright, but you can’t fix poorly positioned ones without rewiring.
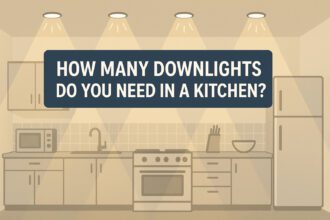
How Many Downlights Do You Need in a Kitchen?
Before worrying about exact spacing, you need to know roughly how many downlights your kitchen requires.
The general rule is 1 downlight per 1.5–2m² of floor space, depending on lumen output.
Here’s what that looks like for typical UK kitchens:
| Kitchen Size | Floor Area | Downlights Needed |
|---|---|---|
| Small galley | 6–8m² | 3–5 |
| Medium U-shape | 10–12m² | 5–7 |
| Large with island | 15–20m² | 8–12 |
| Open-plan kitchen-diner | 25–35m² | 12–18 (kitchen zone only: 6–10) |
These are starting points. The exact number depends on:
- Lumen output per downlight — 500-700lm downlights need tighter spacing than 800-1000lm units
- Ceiling height — higher ceilings spread light wider, so you may need fewer
- Worktop configuration — more worktop runs mean more task lighting positions
- Other light sources — under-cabinet lights, pendants, and LED strips reduce downlight requirements
Don’t guess. Use our Downlight Spacing Calculator to get an accurate count for your specific kitchen dimensions.
The 3 Kitchen Downlight Spacing Rules You Can Trust
Professional lighting designers use three core rules for kitchen layouts. Follow these and you’ll avoid 90% of common mistakes.
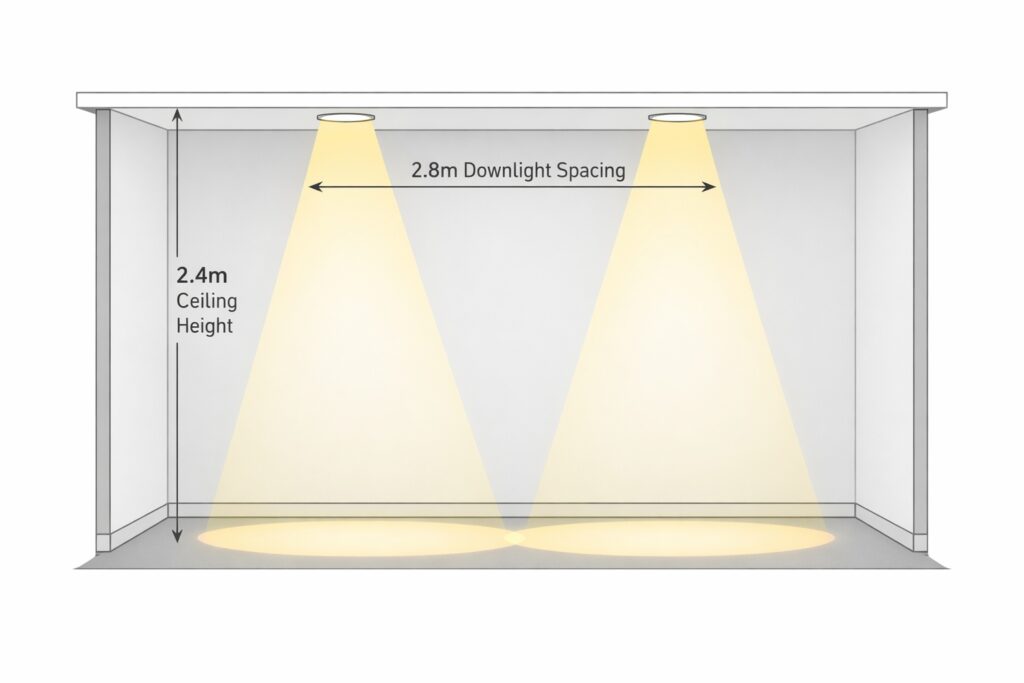
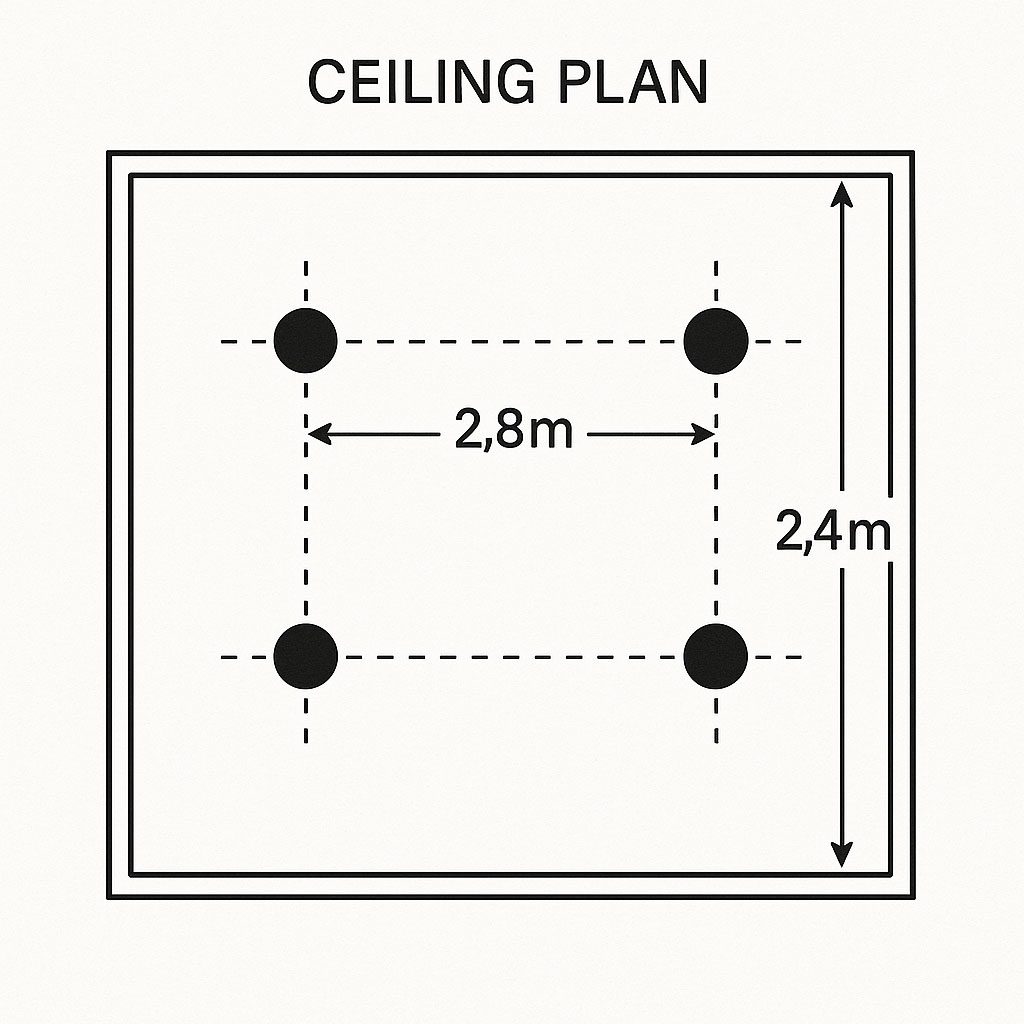
Rule 1: Spacing = Ceiling Height × 1.2
This formula ensures downlight beams overlap correctly at worktop height.
For standard UK ceiling heights:
- 2.4m ceiling → 2.8m spacing between downlights
- 2.7m ceiling → 3.2m spacing
- 3.0m ceiling → 3.6m spacing
The maths works because downlight beams expand as they travel down. Taller ceilings allow wider spacing; lower ceilings need tighter placement.
This prevents:
- Hotspots (too close)
- Dark patches between lights (too far)
- Uneven brightness across the floor
CIBSE’s UK lighting guidance supports height-based spacing ratios for residential applications.
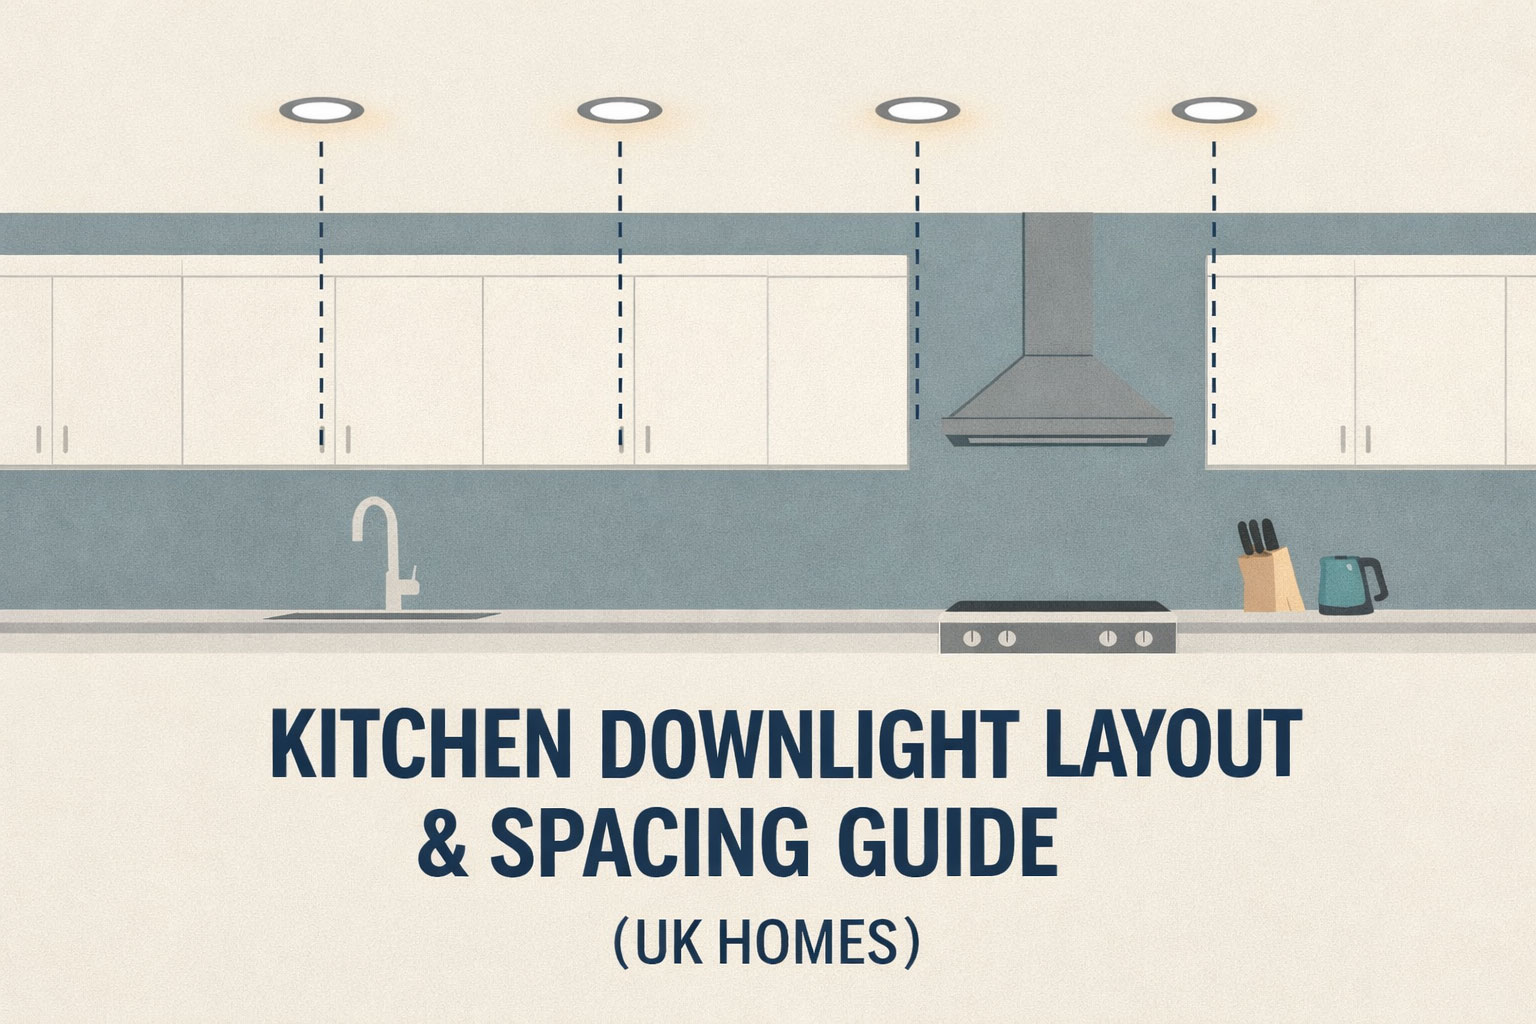
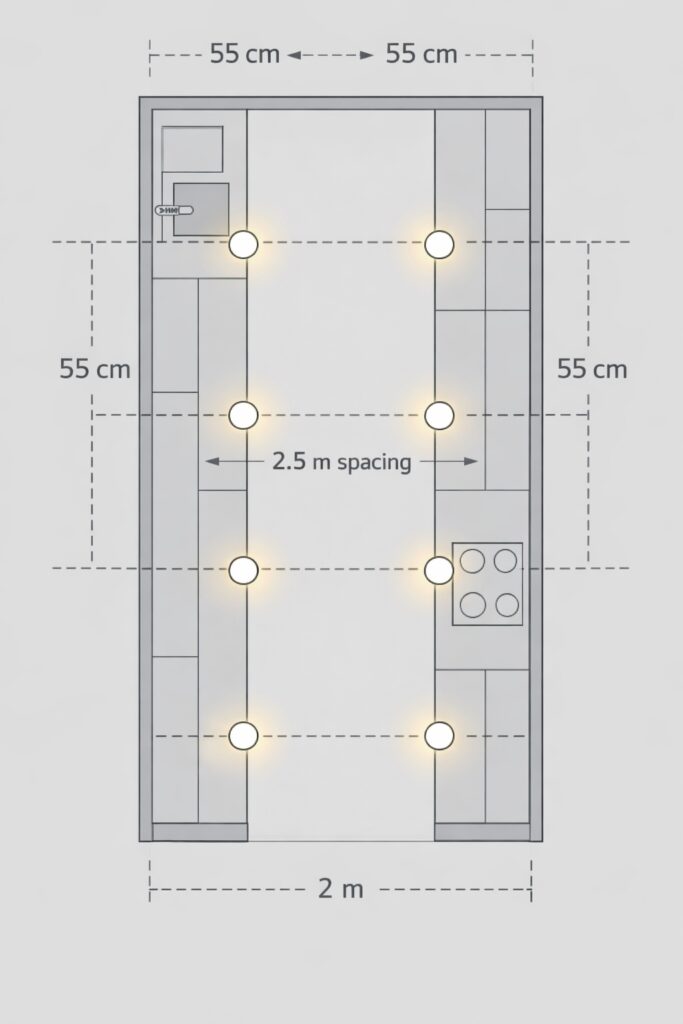
Rule 2: Position Downlights 50–60cm From Wall Cabinets
This is the golden rule for kitchen worktop lighting.
Place each downlight 50–60cm out from the front edge of your wall cabinets.
Why this specific distance?
- Closer than 50cm — the beam hits the cabinet doors, creating glare and wasting light
- Further than 60cm — the beam misses the front of the worktop where you actually work, and your body creates shadows
This 50–60cm sweet spot ensures the light cone lands on the front third of your worktop — exactly where your hands are when prepping food.
This rule stays constant regardless of ceiling height. Whether you have 2.4m or 3m ceilings, the cabinet offset remains 50–60cm.
Rule 3: Keep Your Layout Symmetrical
Random downlight placement looks messy and creates uneven lighting.
Always align your downlights with:
- Cabinet runs — follow the line of your wall units
- Island edges — position around the perimeter, not randomly above
- Ceiling centre lines — maintain visual balance
- Room proportions — respect the geometry of the space
Symmetry isn’t just aesthetic. It ensures even light distribution and makes the kitchen feel professionally designed rather than DIY.
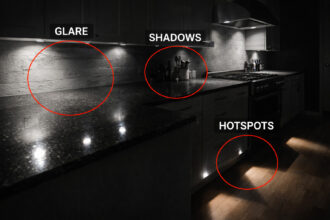
Avoiding Shadows on Kitchen Worktops
Worktop shadows are the most common kitchen lighting complaint — and the hardest to fix after installation.
Why Shadows Form
When ceiling downlights are your only light source, shadows are inevitable. Here’s what happens:
- You stand at the worktop facing the wall
- The downlight is behind you (toward the room centre)
- Your body blocks the light
- A shadow falls across your hands and work area
This is worst for:
- Chopping vegetables
- Reading recipes
- Detailed food prep
- Washing up at the sink
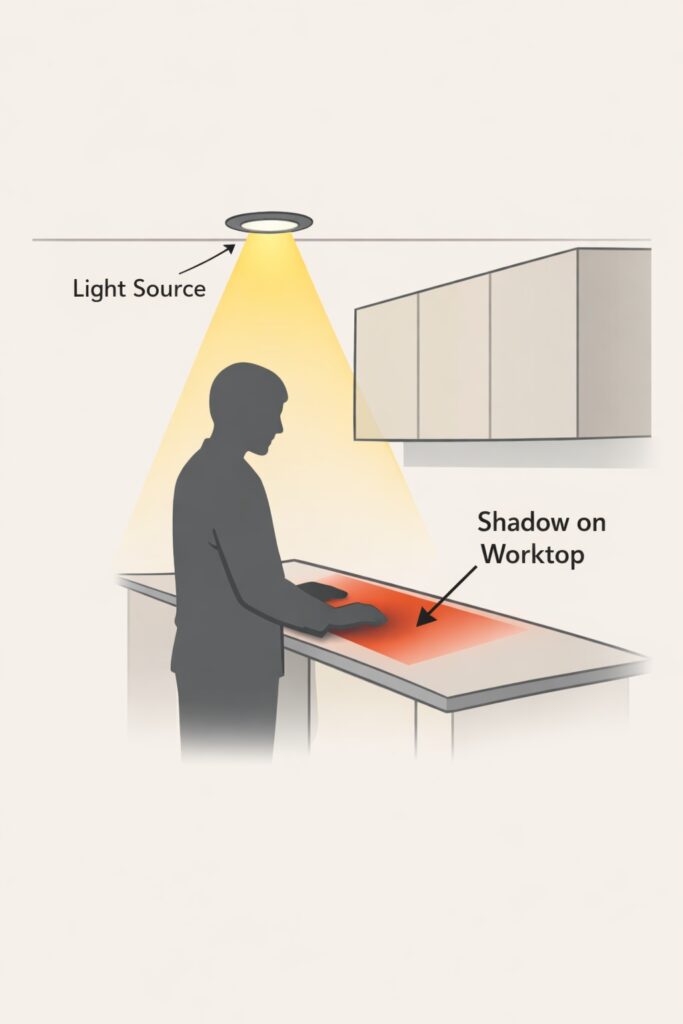
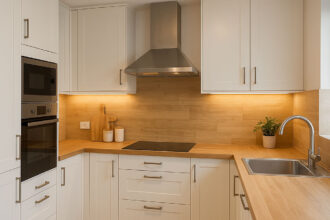
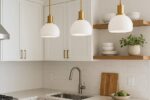
The Solution: Layered Lighting
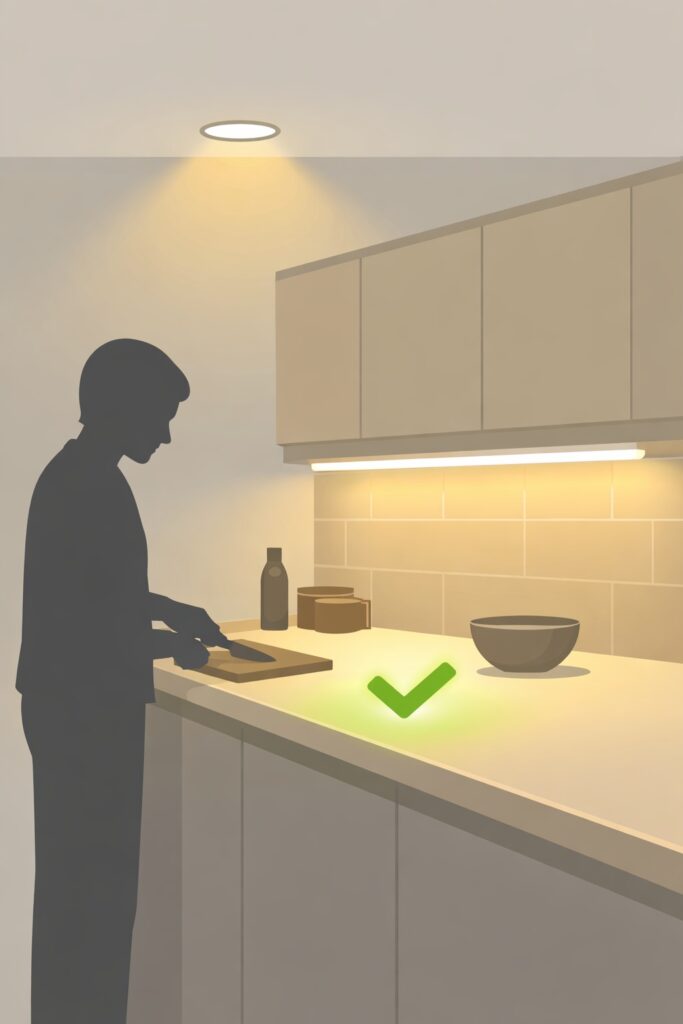
Downlights alone cannot eliminate worktop shadows. You need under-cabinet lighting as a dedicated task layer.
LED strips or puck lights mounted beneath wall cabinets throw light directly onto the worktop from above and in front of you. This fills in the shadows that ceiling lights create.
The ideal kitchen lighting combination:
- Downlights — general ambient light, positioned 50–60cm from cabinets
- Under-cabinet lights — direct task lighting on worktops
- Pendant lights — decorative accent over islands or dining areas
LED strips or puck lights mounted beneath wall cabinets throw light directly onto the worktop. Warm white LED strip kits are the most popular choice for UK kitchens.
For under-cabinet options, see our guide to shadow-free under-cabinet lighting.
Kitchen Downlight Layout Examples
Here’s how spacing rules apply to the most common UK kitchen shapes.
Small Kitchens (6–10m²)
Recommended layout:
- 3–4 downlights in a single row or L-shape
- 2.6–2.8m spacing between lights
- 50–60cm offset from wall cabinets
Small kitchens often need fewer downlights than people expect. Spacing matters more than quantity — three well-positioned lights beat six poorly placed ones.
Common mistake: Cramming in too many downlights creates harsh, clinical lighting. In compact spaces, less is more.
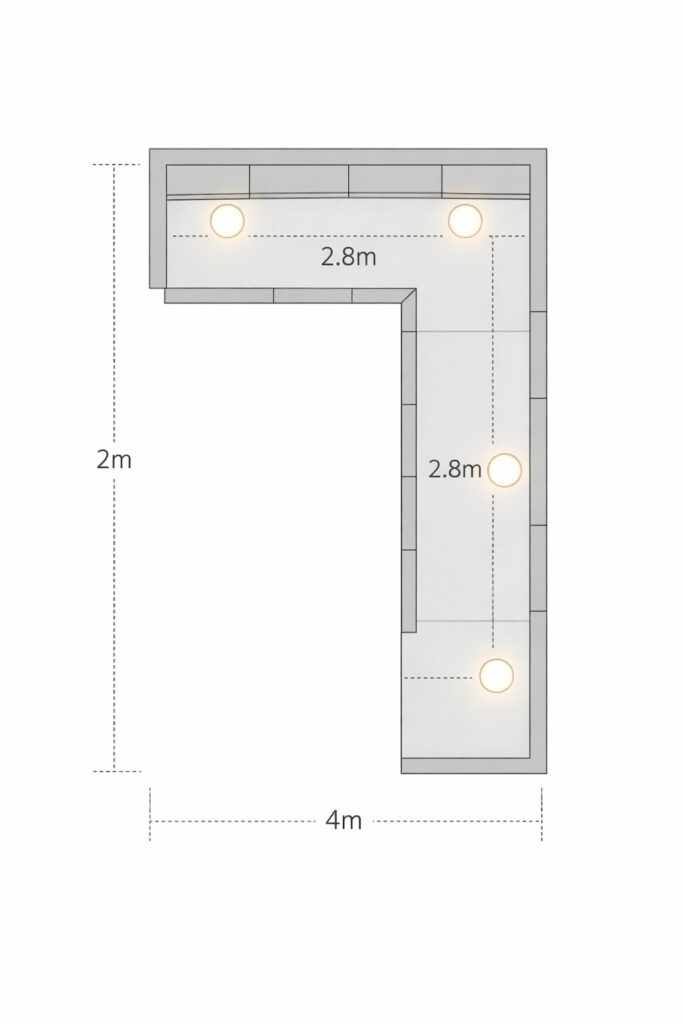
Galley Kitchens
Recommended layout:
- Two parallel rows of downlights
- Each row positioned 55cm from its cabinet run
- 2.8–3.2m spacing along the length
Galley kitchens have worktops on both sides, so you need two rows of task lighting. Each row serves one worktop run.
Pro tip: If your galley is narrow (under 2m wide), a single central row may work, but you’ll need stronger under-cabinet lighting to compensate for shadow angles.
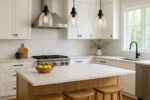
Island Kitchens
Recommended layout:
- Perimeter downlights around the main worktop runs (50–60cm offset)
- NO downlights directly above island seating
- Pendant lights over the island centre for ambient/decorative lighting
- 2.8–3.2m spacing maintained throughout
Why no downlights over islands?
If your island has seating, downlights directly above will shine into people’s eyes. Use pendants instead — they’re lower, softer, and more suited to dining.
Downlights should illuminate the working edges of the island, not the socialising centre.
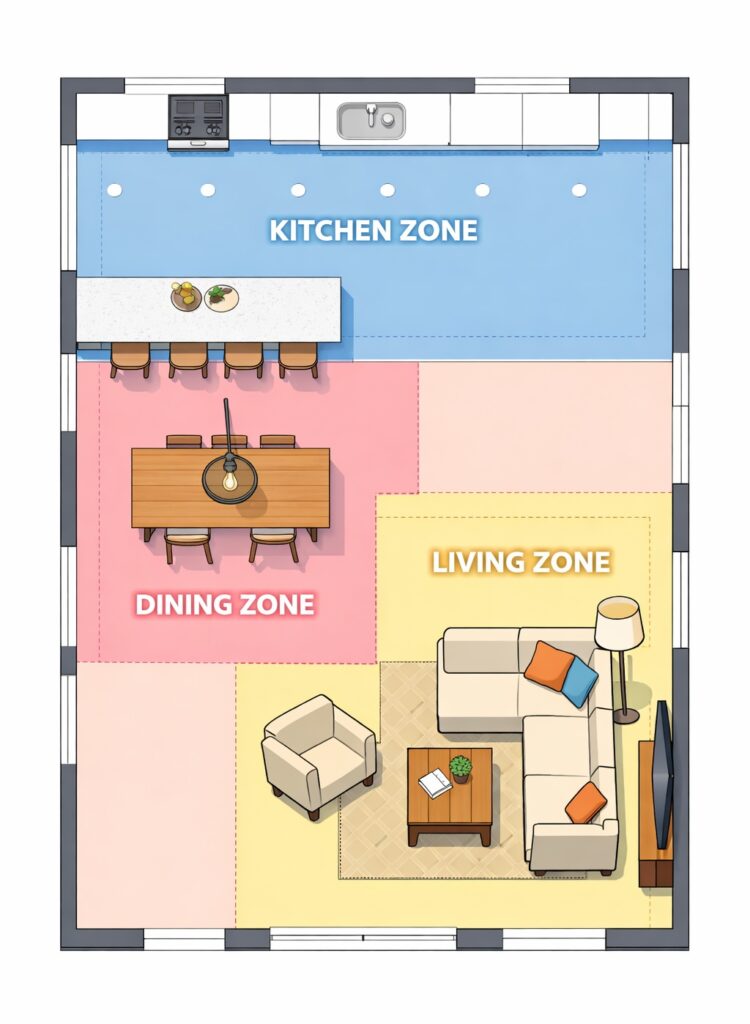
Open-Plan Kitchen-Diners
Recommended layout:
- Downlights concentrated in the kitchen zone only
- Pendants over the dining table
- LED strips or ambient lighting in the living area
- Clear visual separation between zones
Open-plan spaces need lighting zones, not uniform downlight grids. A row of identical downlights marching across kitchen, dining, and living areas creates what designers call “airport runway syndrome” — functional but soulless.
Zone your lighting:
| Zone | Primary Lighting | Secondary |
|---|---|---|
| Kitchen | Downlights (task) | Under-cabinet strips |
| Dining | Pendant (feature) | Dimmed downlights |
| Living | Floor/table lamps | Wall washers |
For detailed zoning strategies, see our guide to open-plan kitchen-diner lighting.
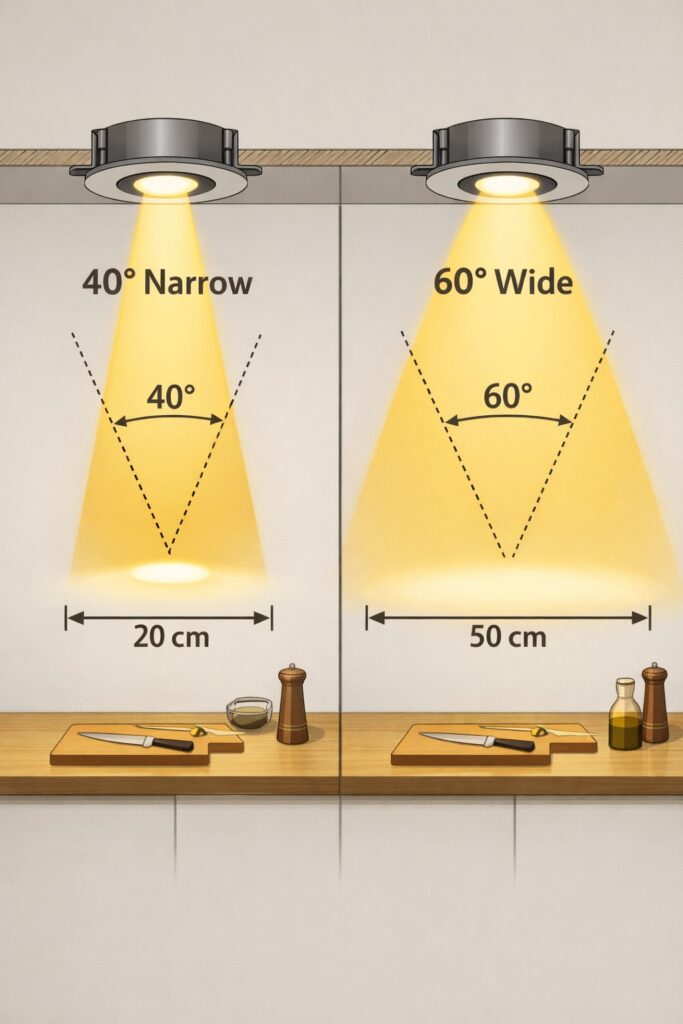
Best Beam Angles for Kitchen Downlights
Beam angle affects how light spreads — and therefore how far apart your downlights should be.
Recommended for kitchens: 40°–60°
Narrow Beam (40°)
- Bright, focused cone of light
- Higher contrast, more dramatic
- Better for high ceilings (2.7m+)
- Requires slightly closer spacing
Wide Beam (60°)
- Softer, more diffused light
- Even wash with less contrast
- Ideal for standard 2.4m ceilings
- Allows wider spacing
Critical Rule: Never Mix Beam Angles
Most quality kitchen downlights come in either 40° or 60° variants — check the spec before buying
Using different beam angles in the same kitchen creates patchy, uneven lighting. Some areas will be bright pools; others will be dim. It looks terrible.
Pick one beam angle and use it consistently across all your kitchen downlights.
Common Kitchen Downlight Mistakes
Avoid these errors and you’ll be ahead of 80% of DIY kitchen lighting projects.
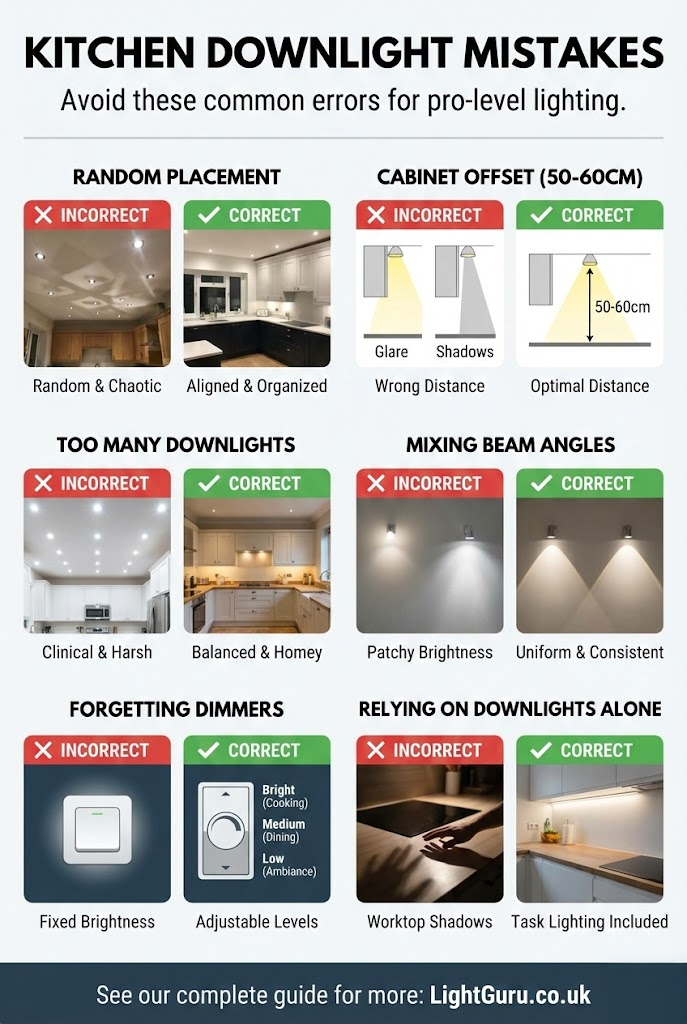
1. Random Placement
“Just put them where there’s space” leads to uneven lighting and visual chaos. Always follow cabinet lines and room geometry.
2. Ignoring the 50–60cm Cabinet Offset
Too close = cabinet glare. Too far = worktop shadows. This single measurement makes or breaks kitchen lighting.
3. Too Many Downlights
More isn’t better. Excessive downlights create harsh, clinical environments that feel like a hospital rather than a home. Start with fewer and add under-cabinet lighting for task areas.
4. Mixing Beam Angles
Creates patchy brightness. Use one beam angle throughout.
5. Forgetting Dimmers
Kitchens need different light levels for cooking (bright), dining (medium), and evening ambience (low). Always install dimmers.
6. Relying on Downlights Alone
Without under-cabinet lighting, you’ll always have worktop shadows. Downlights are ambient light; you need task lighting too.
For more pitfalls to avoid, see our complete guide to kitchen lighting mistakes.
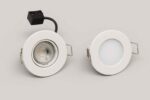
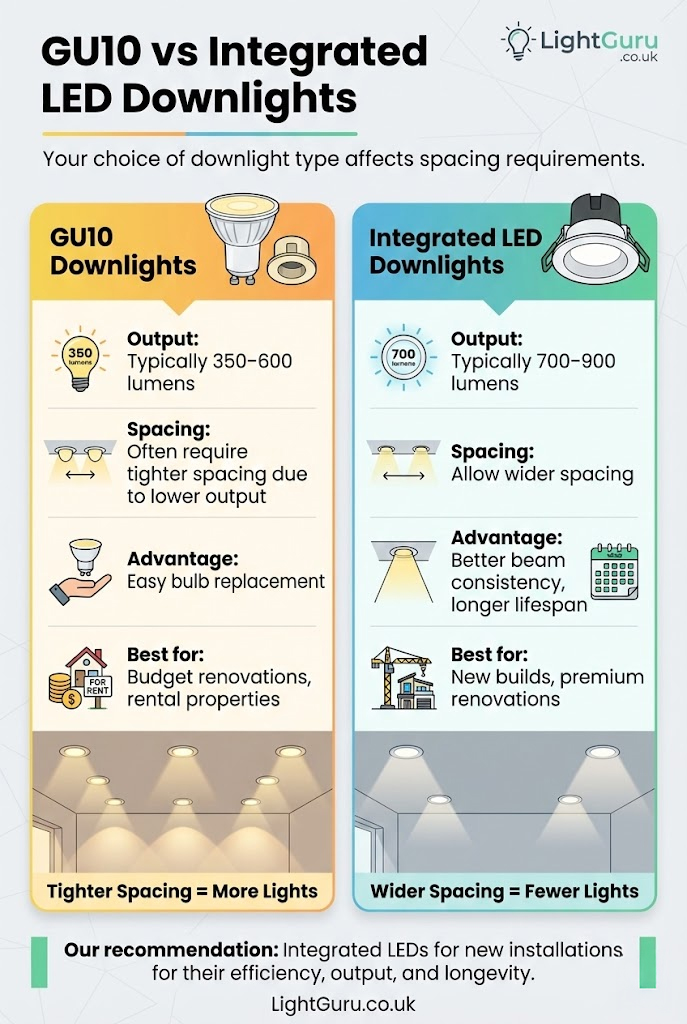
GU10 vs Integrated LED Downlights
Your choice of downlight type affects spacing requirements.
GU10 Downlights
- Output: Typically 350–600 lumens
- Spacing: Often require tighter spacing due to lower output
- Advantage: Easy bulb replacement
- Best for: Budget renovations, rental properties
GU10 downlights are budget-friendly and replacement bulbs are cheap, but output is typically lower than integrated units.
Integrated LED Downlights
- Output: Typically 700–900 lumens
- Spacing: Allow wider spacing
- Advantage: Better beam consistency, longer lifespan
- Best for: New builds, premium renovations
Integrated LEDs for new kitchens. The higher output means fewer fittings, cleaner ceiling appearance, and more consistent light quality.
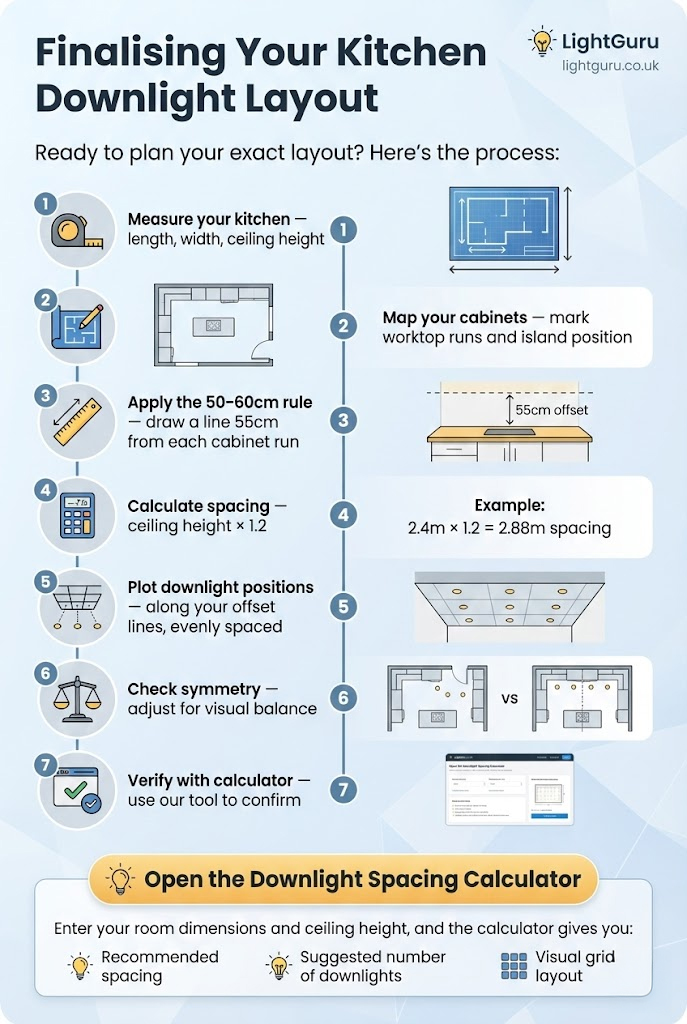
Finalising Your Kitchen Downlight Layout
Ready to plan your exact layout? Here’s the process:
- Measure your kitchen — length, width, ceiling height
- Map your cabinets — mark worktop runs and island position
- Apply the 50–60cm rule — draw a line 55cm from each cabinet run
- Calculate spacing — ceiling height × 1.2
- Plot downlight positions — along your offset lines, evenly spaced
- Check symmetry — adjust for visual balance
- Verify with calculator — use our tool to confirm
→ Open the Downlight Spacing Calculator
Enter your room dimensions and ceiling height, and the calculator gives you:
- Recommended spacing
- Suggested number of downlights
- Visual grid layout
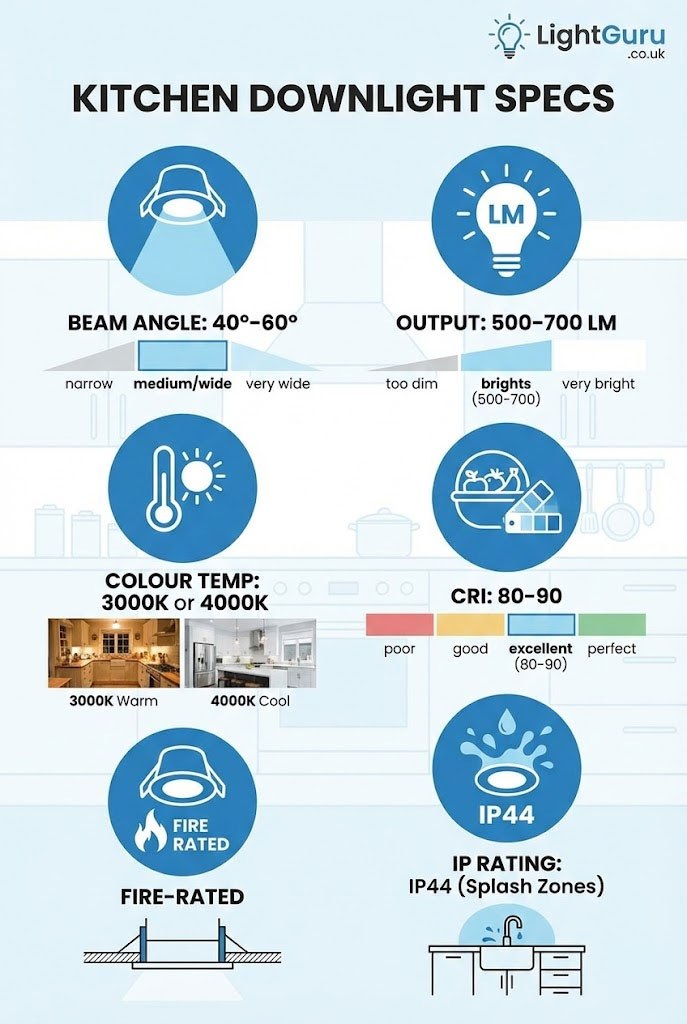
Specification Checklist
When buying downlights for your kitchen:
- ✓ Beam angle: 40°–60°
- ✓ Output: 500–700 lumens per downlight
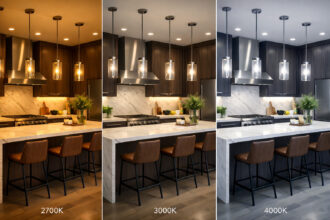
- ✓ Colour temperature: 3000K (warm white) for most kitchens, 4000K for modern/clinical aesthetics
- ✓ CRI: 80-90 for accurate food colours
- ✓ Fire-rated: Required for ceiling installations in UK
- ✓ IP rating: IP44 minimum if near sink splash zones
FAQs
How far apart should kitchen downlights be?
Use the formula: ceiling height × 1.2. For a standard 2.4m ceiling, this gives approximately 2.8m spacing.
How far from the wall should kitchen downlights be?
Position them 50–60cm from the front edge of wall cabinets. This ensures light falls on the worktop, not the cabinet doors.
How many downlights per square metre in a kitchen?
Roughly 1 downlight per 1.5–2m², depending on lumen output. A 12m² kitchen typically needs 6–8 downlights.
What beam angle is best for kitchens?
40°–60°. Narrower beams (40°) suit high ceilings; wider beams (60°) suit standard heights.
Should downlights go directly above a kitchen island?
Only above working areas. Avoid placing downlights directly above seating – use pendants there instead.
Summary
A well-planned kitchen downlight layout comes down to five things:
- The 1.2× spacing rule — ceiling height × 1.2 for distance between lights
- The 50–60cm cabinet offset — critical for shadow-free worktops
- Symmetry — align with cabinets, islands, and room geometry
- Consistent beam angles — never mix different angles
- Layered lighting — add under-cabinet lights for complete shadow control
Get these right and your kitchen will be evenly lit, practical, and beautifully designed.
Next steps: