
Ceiling lighting does the heavy lifting in any kitchen. It sets the overall brightness, defines the mood, and determines whether your worktops are properly lit or lost in shadow. Yet in most UK homes, the kitchen ceiling still relies on a single central fitting that leaves half the room underlit.
This guide covers the four main types of kitchen ceiling lighting — flush mounts, semi-flush mounts, track lighting, and recessed downlights — and explains when each one works best, how to combine them, and what to avoid.
This article explores lighting from a style and inspiration perspective. For technical layout, brightness, and placement guidance, see our main kitchen lighting guide.
Table of Contents
Flush-Mount Lighting: Slim, Practical and Perfect for Low Ceilings
Flush-mount ceiling lights sit directly against the ceiling with no gap or drop, making them the most practical option for kitchens with limited headroom. In older UK homes where ceiling heights sit around 2.2 to 2.4 metres, a flush fitting keeps things clean without eating into the space.
They work particularly well in galley kitchens, small rental kitchens, and utility-style layouts where you need reliable brightness without visual clutter. A single large flush mount can cover a small kitchen on its own, while two or three smaller fittings spread across a longer room give more even coverage.
When flush mounts make sense
Flush fittings are the right choice when your ceiling height is under 2.4 metres, when you want a fitting that blends into the ceiling rather than drawing attention, or when you need something simple that works with any décor style. They are also a solid option for rental properties because most modern flush LEDs are easy-fit designs that clip onto an existing ceiling rose with no rewiring.
Colour temperature advice
For flush fittings in kitchens, 3000K is the sweet spot. It gives you a warm but clear light that makes food look natural and surfaces easy to read. Going too warm at 2700K can feel a bit flat in a white or light-coloured kitchen, while anything above 4000K starts to feel clinical.
What to look for
Choose a flush mount with a CRI of 90 or above for accurate colour rendering, a wide beam angle of at least 120 degrees for even spread, and an IP44 rating if the fitting will be positioned near a sink or hob where steam is a factor.
Get the Look — Flush Mounts
Style pick: A square or geometric flush mount in brushed brass or matt black for a contemporary edge — around £40–70.
Budget pick: A slim round LED panel in white, 18W, 3000K — around £15–25. Look for brands like Eglo or Searchlight.
Mid-range pick: A circular flush mount with an opal diffuser and chrome trim — around £30–50.
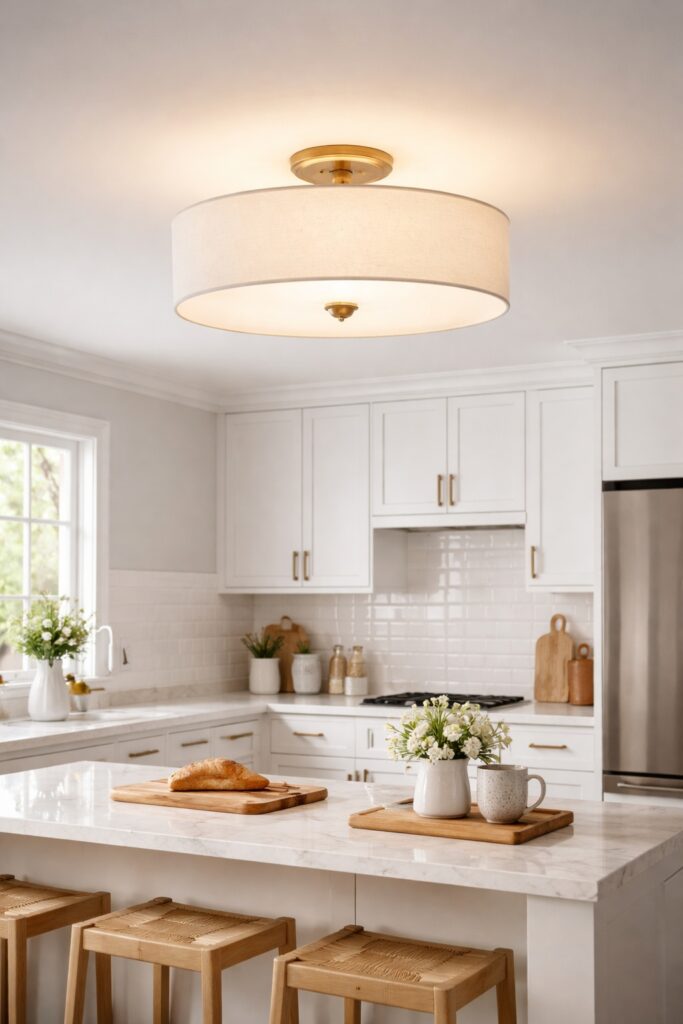
Semi-Flush Lighting: A Short Drop With More Character
Semi-flush mounts drop between 15 and 30 centimetres from the ceiling, which gives them more visual presence than a flush fitting while still keeping well clear of head height. That short drop also lets light escape both downward and sideways, creating a softer, more diffused glow that works beautifully in kitchen-diners and open-plan spaces.
They are the middle ground between a flush light and a pendant — enough design detail to act as a focal point, but compact enough for standard UK ceiling heights.
Where semi-flush fittings shine
These work best in kitchens with ceilings around 2.4 to 2.6 metres, where you have enough room for the drop but not enough for a full pendant. They are particularly good over breakfast bars, dining nooks, and central kitchen areas where you want a single statement fitting to anchor the room.
In cottage-style or traditional kitchens, a semi-flush with a fabric drum shade or frosted glass diffuser gives a warm, layered feel. In more modern spaces, look for geometric metalwork or smoked glass designs that add interest without dominating.
Practical considerations
Check the total drop measurement before buying. Some semi-flush fittings labelled as “compact” still hang 35 to 40 centimetres from the ceiling, which can feel intrusive at 2.4 metres. Aim for a maximum drop of 25 to 30 centimetres in a standard UK kitchen.
Also consider cleaning. Kitchen ceilings collect grease and dust, so choose a semi-flush with smooth surfaces or removable glass shades that you can wipe down easily.
Get the Look — Semi-Flush
Statement piece: A three-light semi-flush cluster in antique brass with opal glass — around £60–100.al and glass ceiling light in a mid-height modern kitchen, illuminated warmly, photographed at dinner-hour mood.
Warm traditional: A drum-shade semi-flush in linen or cotton with a brushed chrome base — around £35–60.
Modern minimal: A smoked glass globe semi-flush in matt black — around £40–75.
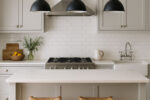
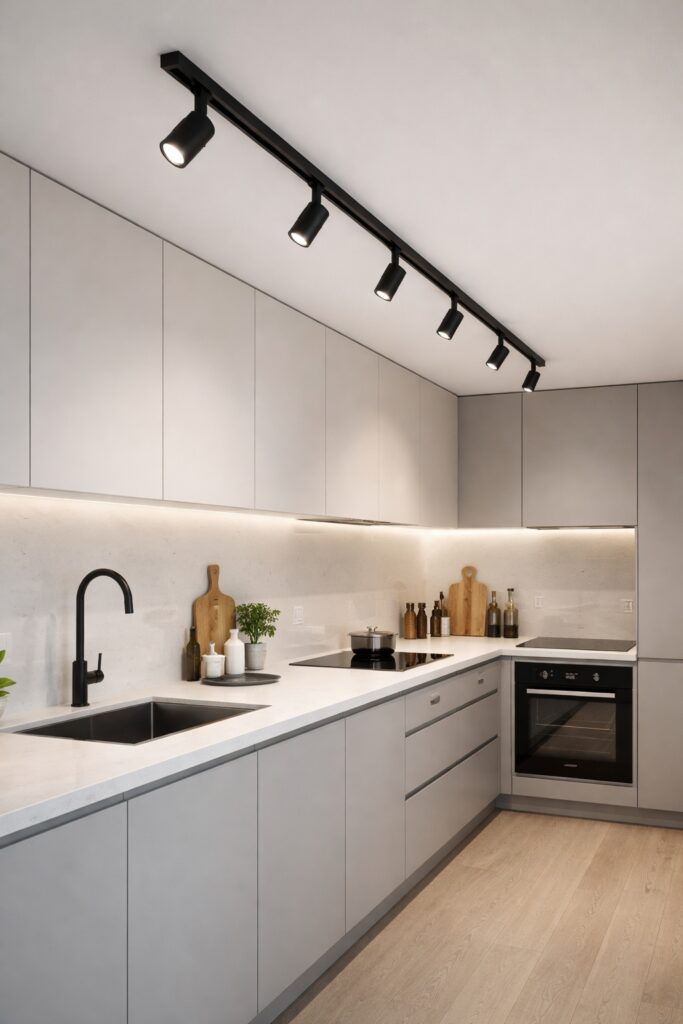
Track Lighting: Flexible, Modern and Surprisingly Versatile
[Image: A sleek matt black track lighting system running along a galley kitchen ceiling, with adjustable LED heads angled toward worktops and a backsplash.]
Track lighting has come a long way from the chunky halogen systems of the 1990s. Modern LED track systems are slim, directional, and available in finishes that suit everything from Scandi-minimal to industrial. The real advantage is flexibility — each spotlight head adjusts independently, so you can point light exactly where it is needed.
This makes track lighting particularly useful in kitchens with awkward layouts, vaulted or angled ceilings, or where the joist positions make it impossible to install downlights in the right places. A single track with four or five adjustable heads can replace what would otherwise need multiple fixed fittings.
Best applications for track lighting
Track systems excel in galley kitchens where a single run along the ceiling can light both sides of the workspace. They are also excellent for kitchens where you want to highlight specific features — a tiled backsplash, open shelving, or a display wall.
In open-plan layouts, a track can define the kitchen zone visually, running along the cooking and prep area while the rest of the room uses different fittings.
How to get the angles right
The most common mistake with track lighting is pointing all the heads straight down, which creates harsh pools of light and deep shadows between them. Instead, angle the heads toward the vertical surfaces — worktops, backsplashes, and cabinet fronts. This bounces light around the room more naturally and reduces glare.
For a standard 3-metre kitchen, a track with four to five heads spaced evenly will give good coverage. Choose LED heads with a 35 to 45 degree beam angle for focused task lighting, or 60 degrees for broader ambient coverage.
Safety note
If you are installing a new track system, the wiring should be carried out by a qualified electrician or a registered competent person. Track systems typically connect to a single ceiling point, but check that your existing circuit can handle the total wattage.
Get the Look — Track Lighting
- Scandi clean: A white slim track with cylindrical spot heads — around £40–70 for a 4-head system.
- Industrial edge: Matt black track with exposed-style cage heads — around £50–80.
- Premium modern: Brushed brass or gunmetal track with integrated LED modules — around £80–140.
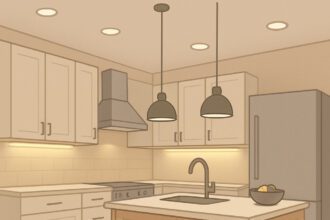
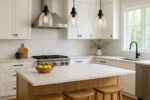
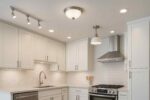
Recessed Downlights: Clean Lines and Even Coverage
[Image: A modern UK kitchen with evenly spaced LED downlights in the ceiling, illuminating white shaker cabinets and a stone worktop. Clean, bright, and contemporary.]
Recessed downlights remain the most popular kitchen ceiling lighting choice in UK new builds and renovations, and for good reason. They sit flush within the ceiling, create no visual clutter, and deliver consistent, controllable brightness across the whole room.
When properly spaced and specified, downlights eliminate the shadow problems that plague single-fitting kitchens. Combined with a dimmer, they also give you full control over mood — bright and functional for cooking, softer and warmer for evening entertaining.
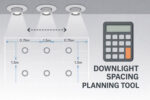
Spacing guidelines
The general rule for downlight spacing is to divide your ceiling height by two. In a standard UK kitchen with a 2.4-metre ceiling, that means spacing downlights approximately 1.2 metres apart. Keep the first row at least 60 centimetres from the walls to avoid lighting the wall rather than the worktop.
For a more detailed breakdown including layout diagrams and calculations, see our complete downlight guide.
Colour temperature for downlights
Downlights are where colour temperature choice matters most, because they are usually the primary light source in the room.
- 3000K is the best all-rounder for UK kitchens — warm enough to feel inviting, clear enough to prep food and read recipes without strain.
- 2700K works well if you have a separate, brighter task light over the worktops and want the downlights to provide softer ambient light.
- 3500K to 4000K suits utility-focused kitchens or spaces where precise colour rendering is important, such as a kitchen used for photography or baking.
Specification essentials
Always choose fire-rated downlights if they penetrate a ceiling that separates floors — this is a Building Regulations requirement. Look for IC-rated (insulation contact) fittings if your loft insulation sits directly above, and choose dimmable drivers if you plan to use a dimmer switch.
A CRI of 90 or above is strongly recommended in kitchens. Lower CRI ratings make food look dull and can distort the colour of your cabinetry and worktops.
Get the Look — Downlights
- Reliable standard: Saxby Lalo or Luceco fire-rated LED downlights, 3000K, IP65 — around £8–15 each.
- Premium finish: Brushed chrome or antique brass bezels for a warmer aesthetic — around £12–20 each.
- Smart option: Downlights compatible with dimmers or smart home systems like Hive or Philips Hue — around £20–35 each.
What Works Best for Low-Ceiling Kitchens
Most UK kitchens built before the 1990s have ceiling heights between 2.2 and 2.4 metres, which limits what you can comfortably hang from the ceiling. The priority in these spaces is getting enough brightness without anything protruding too far.
Best options for low ceilings:
Flush mounts, recessed downlights, and slimline track systems all work well. Flush LED panels with a depth of 20 millimetres or less are almost invisible once installed and deliver excellent coverage. Downlights sit entirely within the ceiling void so they take up no room at all.
What to avoid:
Large pendants, deep semi-flush fittings with drops over 25 centimetres, and chandeliers. Even if the clearance technically allows them, a bulky fitting at 2.2 metres creates a cramped, top-heavy feel.
Adding layers without losing headroom:
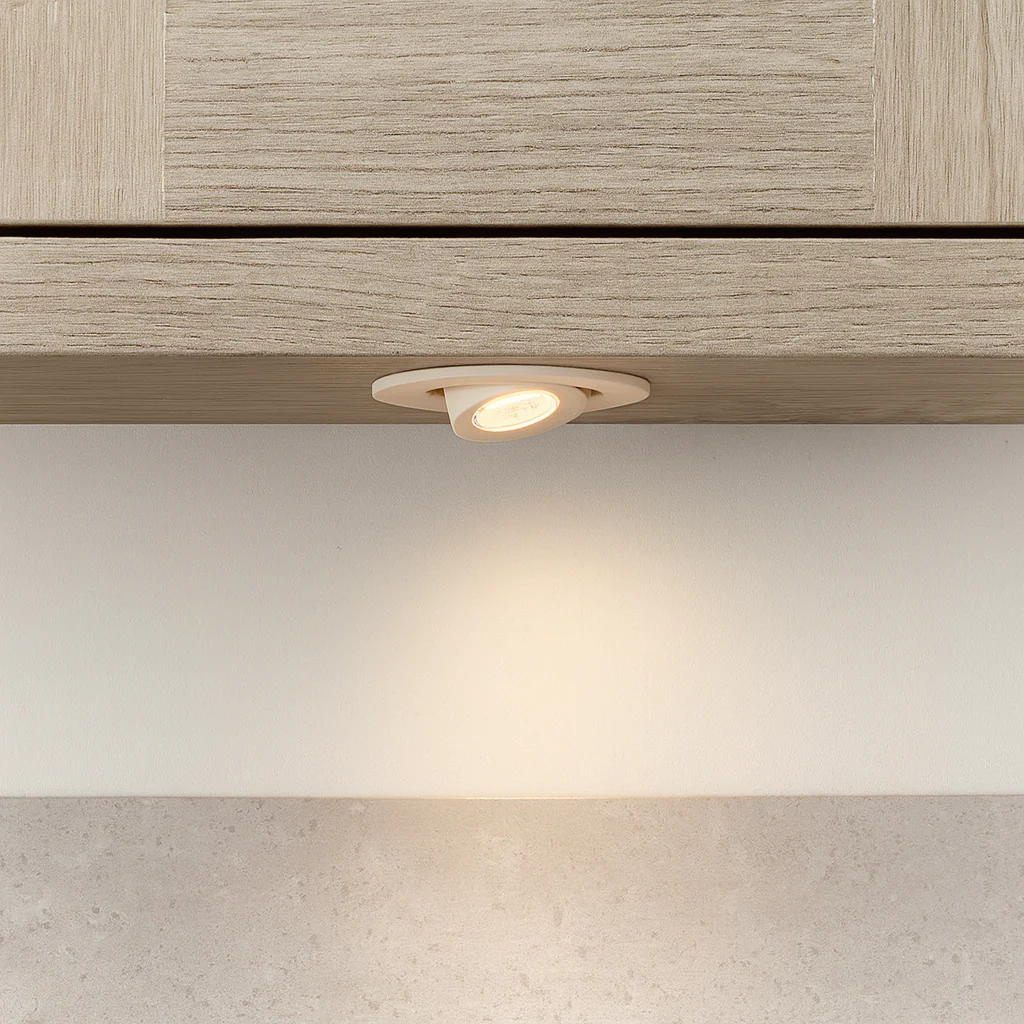
If your kitchen feels flat with just ceiling lighting, add layers lower down. Under-cabinet LED strips light up your worktops and create depth, while plinth lighting adds a soft glow at floor level that makes the room feel larger.
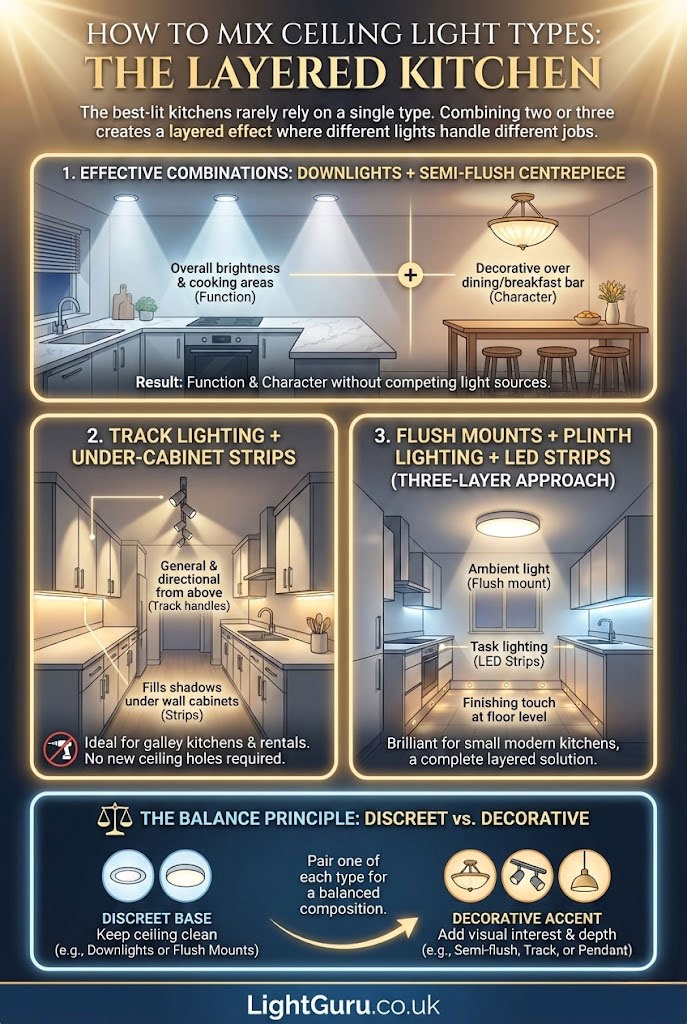
How to Mix Ceiling Light Types
The best-lit kitchens rarely rely on a single type of ceiling fitting. Combining two or three types creates a layered effect where different lights handle different jobs.
Effective combinations
Downlights plus a semi-flush centrepiece — use downlights for overall brightness across the worktops and cooking areas, then add a decorative semi-flush over the dining table or breakfast bar. This gives you function and character without competing light sources.
Track lighting plus under-cabinet strips — ideal for galley kitchens and rental properties. The track handles general and directional lighting from above, while strips fill in the shadows under wall cabinets. No new ceiling holes required.
Flush mounts plus plinth lighting plus LED strips — a three-layer approach that works brilliantly in small modern kitchens. The flush mount handles the ambient light, strips deal with task lighting, and plinth lights add a finishing touch at floor level.
The balance principle
Pair one discreet fixture type (downlights or flush mounts) with one more decorative type (semi-flush, track, or a single pendant over a dining area). This keeps the ceiling clean while still giving the room visual interest and depth.
Common Kitchen Ceiling Lighting Mistakes
Relying on a single central fitting
This is the most common problem in UK kitchens. A single ceiling light in the centre of the room means your body casts a shadow over every worktop you stand at. The fix is simple — add at least one more light source positioned over or near the work areas.
Underestimating brightness requirements
Kitchens need more light than most rooms. Aim for 250 to 350 lumens per square metre as a starting point. A 12-square-metre kitchen needs roughly 3,000 to 4,200 total lumens from ceiling sources alone, before you add task lighting. Use our lumens calculator to work out what your space needs.
Choosing the wrong colour temperature
Colour temperature has a bigger impact on how your kitchen feels than most people realise. Going too cool (5000K and above) makes the room feel stark and clinical. Going too warm (2700K) with no supplementary task lighting can make prep work harder than it needs to be. For most kitchens, 3000K is the sweet spot — see our colour temperature guide for a full explanation.
Oversized fittings for the ceiling height
A beautiful semi-flush drum shade that looks perfect in a showroom with 3-metre ceilings can feel oppressive at 2.3 metres. Always check the total drop measurement and mentally subtract it from your ceiling height. If the bottom of the fitting would be below 2 metres from the floor, choose something slimmer.
Forgetting under-cabinet lighting
If your ceiling lights are good but your worktops still feel dark, the problem is almost certainly shadows cast by your wall cabinets. Under-cabinet lighting is not optional in a well-lit kitchen — it is the layer that makes everything else work properly. See our under-cabinet lighting guide for options.

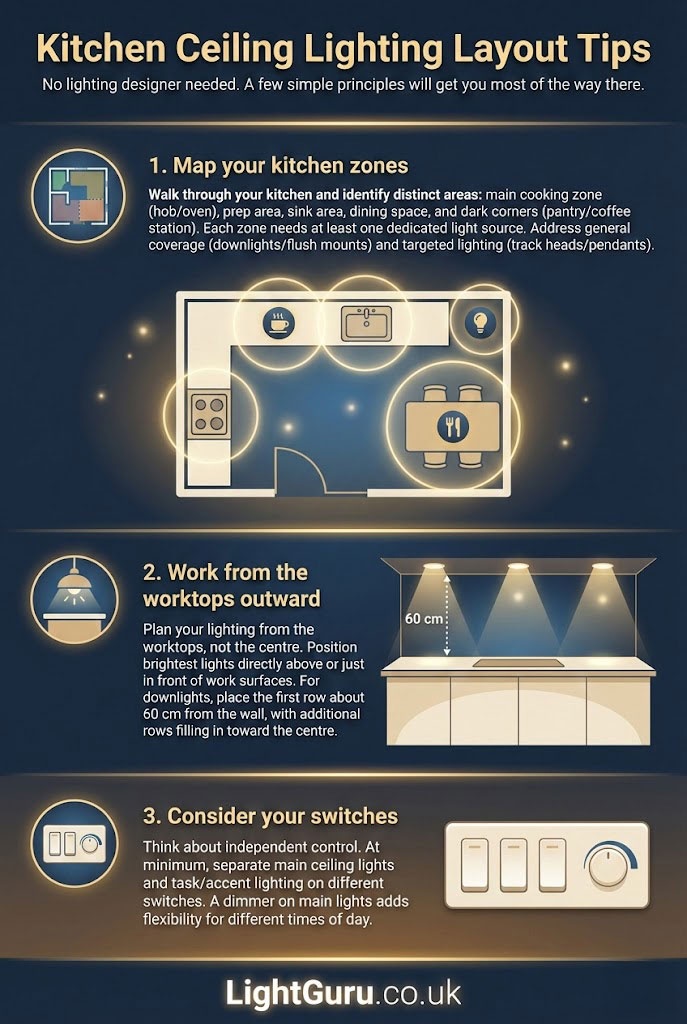
Kitchen Ceiling Lighting Layout Tips
You do not need a lighting designer to get a good ceiling layout. A few simple principles will get you most of the way there.
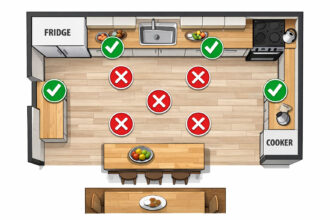
Map your kitchen zones
Walk through your kitchen and identify the distinct areas: the main cooking zone around the hob and oven, the prep area where you do most of your chopping, the sink area, any breakfast bar or dining space, and any dark corners or utility sections like a pantry or coffee station.
Each zone needs at least one dedicated light source. In practice, this means your ceiling lighting plan should address general coverage (downlights or flush mounts across the room) and targeted lighting (track heads or pendants over specific areas).
Work from the worktops outward
Rather than starting with the centre of the ceiling, plan your lighting from the worktops. Position your brightest ceiling lights so they fall directly above or just in front of your main work surfaces. Then fill in the general areas.
For downlights, this usually means placing the first row about 60 centimetres out from the wall where your worktops sit, with additional rows working back toward the centre of the room.
Consider your switches
Think about how you will control different zones independently. At minimum, your main ceiling lights and any task or accent lighting should be on separate switches. A dimmer on the main ceiling lights adds flexibility for different times of day.
LED vs Traditional Bulbs
For kitchen ceiling lighting in 2026, LED is the only sensible choice. The technology has matured to the point where there are no meaningful trade-offs.
LED fittings use around 80 percent less energy than halogen equivalents, last 25,000 to 50,000 hours compared to 2,000 for halogen, reach full brightness instantly, run cool enough to sit safely against insulation, and are compatible with modern dimmers and smart home systems.
The one area where you still need to be careful is colour rendering. Cheap LED fittings with a CRI below 80 can make food and surfaces look washed out. For kitchens, always specify CRI 90 or above. For a full breakdown of LED specifications and what to look for, see our LED lighting guide.
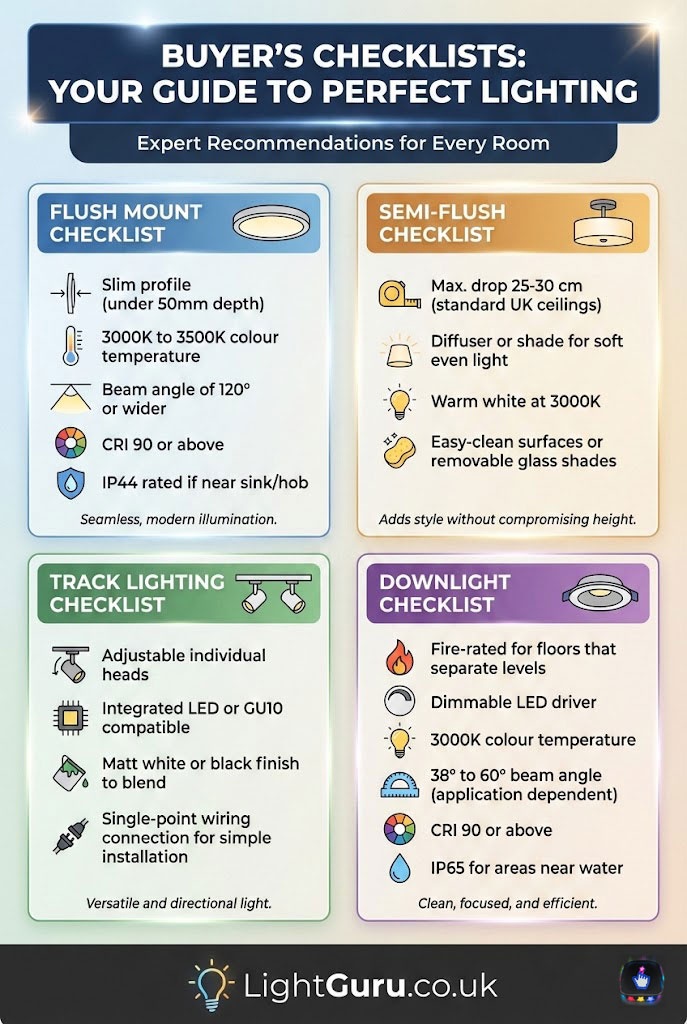
Buyer’s Checklists
Flush mount checklist
Slim profile (under 50mm depth), 3000K to 3500K colour temperature, beam angle of 120 degrees or wider, CRI 90 or above, IP44 rated if positioned near a sink or hob.
Semi-flush checklist
Maximum drop of 25 to 30 centimetres for standard UK ceilings, diffuser or shade for soft even light, warm white at 3000K, easy-clean surfaces or removable glass shades.
Track lighting checklist
Adjustable individual heads, integrated LED modules or compatible with GU10 LEDs, matt white or black finish to blend with the ceiling, single-point wiring connection for simple installation.
Downlight checklist
Fire-rated for floors that separate levels, dimmable LED driver, 3000K colour temperature, 38 to 60 degree beam angle depending on application, CRI 90 or above, IP65 for areas near water.
FAQs
Are downlights better than flush ceiling lights in kitchens?
They serve different purposes. Downlights give more precise, even coverage and a cleaner contemporary look because they sit within the ceiling rather than on it. They are better for shadow control across worktops and islands. Flush mounts are easier and cheaper to install, require no ceiling void, and work well in rental properties or rooms where you cannot cut into the ceiling. Many kitchens use both — downlights over work areas and a flush or semi-flush fitting in the dining zone.
How many ceiling lights does a kitchen need?
This depends on the room size and the type of fitting. As a rough guide, a small UK kitchen of 8 to 12 square metres typically needs four to six downlights or two to three flush-mount fittings to achieve adequate brightness. A larger kitchen-diner of 15 to 20 square metres may need eight to ten downlights plus supplementary lighting over the dining area. Use our lumens calculator to work out the exact requirement for your space.
Can track lighting work in a small kitchen?
Yes, and in many small kitchens it is actually a better option than downlights. A single track with four adjustable heads can light an entire galley kitchen from one ceiling point, with each head directed at a different zone. Modern slimline tracks in white or chrome are visually unobtrusive, and because they connect to a single wiring point, installation is straightforward.
What colour temperature is best for kitchen ceiling lights?
3000K is the most versatile choice for UK kitchens. It provides a warm tone that makes the room feel welcoming while still being bright and clear enough for food preparation, reading recipes, and cleaning. If your kitchen doubles as a workspace or studio, consider 3500K for a slightly crisper feel. Avoid anything above 4000K for general kitchen use unless you have a specific technical reason.
Do you need fire-rated downlights in a kitchen?
If your kitchen ceiling separates two floors — for example, ground floor kitchen with a bedroom above — then yes, fire-rated downlights are required under Part B of the Building Regulations. If the kitchen is on the top floor with only a loft above, fire-rated fittings are still strongly recommended as best practice, particularly if the loft is boarded and used for storage. See our downlight guide for more detail on specifications.
Is it worth installing a dimmer switch for kitchen ceiling lights?
Absolutely. A dimmer gives you bright, functional light for cooking and cleaning, then lets you drop to a softer, warmer level for evening meals or entertaining. Not all LED fittings are compatible with all dimmers, so check that both the fitting and the dimmer are rated for LED use. Trailing-edge dimmers work best with most modern LED downlights and panels.
Can I mix warm and cool lighting in the same kitchen?
You can, but it needs to be deliberate. A common approach is to use 3000K for the main ceiling lights and 2700K for accent or mood lighting such as under-cabinet strips or plinth lights. The slight contrast creates a layered feel without clashing. Avoid mixing 3000K and 5000K in the same room as the contrast will look jarring and make one source always look “wrong.”
How do I light a kitchen with no ceiling void for downlights?
If you have a concrete ceiling or no accessible void, flush mounts, surface-mounted LED panels, and track lighting are your best options. Modern surface-mount panels can be as slim as 20 millimetres and deliver the same even coverage as recessed downlights. Track systems also work well because they connect to a single ceiling point and can be directed to cover the entire room.
Conclusion
Kitchen ceiling lighting is the foundation that everything else builds on. Get it right and your worktops are clear, your room feels spacious, and the mood shifts naturally from bright morning coffee to relaxed evening cooking.
The choice between flush, semi-flush, track, and downlights comes down to your ceiling height, your layout, and how much installation work you are prepared to do. In most UK kitchens, a combination of two types will give the best results — typically downlights or flush fittings for general coverage, with a second type adding focus or character where it is needed.
For the full kitchen lighting picture including pendants, under-cabinet options, and room-by-room planning, see our complete kitchen lighting guide.